vSphere 7 with Kubernetes Part 5 – Create Tanzu Kubernetes Grid Cluster
In part 1 of this blog series, I covered how to create Storage tag and Policy to be used for the Workload management.
In part 2 of this blog series, I covered how to enable Workload Management on vSphere 7.
In part 3 of this blog series, we discovered how to set up the Content Library.
In part 4 of this blog series, we enabled Harbor Image Registry.
In this 5th part of the blog series, we will see how to deploy Tanzu Kubernetes Grid (TKG) cluster. Previously, these clusters were referred to as ‘Guest Cluster’.
TKG cluster is a Kubernetes cluster that runs inside VMs, and these VMs are loaded on Supervisor Cluster. TKG Cluster is fully conformant Kubernetes cluster running on VMs. TKG Clusters in vSphere uses the Open Source Cluster APIs for LCM.
TKG is built to include the tools and Open Source technologies needed to deploy and operate a salable Kubernetes environment.
Let us create a TKG cluster.
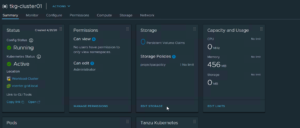
First of all, we will need a Namespace that needs to be created in vSphere 7 with Kubernetes environment.
A namespace will look like below.
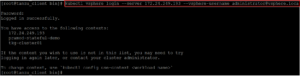
Now, you will download the TKG Command Lines or vSphere Kubectl Command Lines by access your Supervisor Cluster VM’s IP address.

Once the Kubernetes CLI tool is installed on your client, we will need to login and authenticate to Supervisor Cluster VMs IP address using necessary user ID and Password. I am using local [email protected].
Make sure you have the necessary virtual machine images available to build the TKG cluster. These images are listed here based on Content Library that we have enabled. If you need more information on enabling Content Library, Please check part 3 of this blog series, where we discovered how to setup Content Library.

I am using a YAML file with the necessary declarations to create my TKG Cluster. Make sure you use the correct version in the YAML file.
Below is the YAML file for your reference.
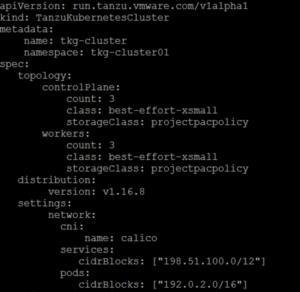
Once we have necessary YAML file to create TKG cluster, Apply that YAML file with standard Kubectl command.

Observe the status of the TKG cluster.

After a few mins, the TKG cluster will be up and running.

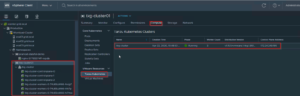
You can verify the successful TKG deployment from vCenter. Notice the Distribution version & Control Plane Address.
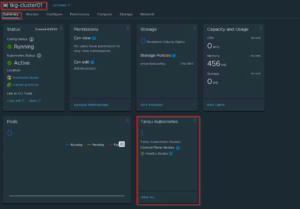
TKG cluster status can be seen from the Namespace that we used to deploy the TKG cluster. Have a look at this Namespace overview which shows TKG information.
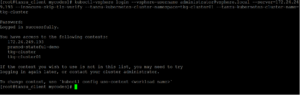
Finally, you can log in to Tanzu Kubernetes Cluster under TKG Namespace.
Switch to correct Context to manage and operate the Kubernetes workload.
In the next part for the blog series, I will cover how to patch vSphere 7 Kubernetes Storage Class to ‘Default’ in order to create persistent container volumes.
Hope you enjoyed this post, I’d be very grateful if you’d help to share it on Social Media. Thank you!